Sunday, October 14, 2012

Weave a Tiny Paper Bag

The latest issue of Handwoven (Nov/Dec 2012) arrived in the mail yesterday.  Almost immediately, there was a post on one of the weaving boards I am on, from a weaver that was frustrated with the lack of illustrated instructions for one of the projects, a tiny woven paper bag found on page 14.  I got out some 12" square scrapbooking paper this morning and tried it.  I could understand why the other weaver was frustrated, because I couldn't figure it out either, or at least not in the time I had before church. 
When I got home this afternoon, I decided I would figure it out and photograph the process. 

First, cut 5" squares form each corner of the 12" square.

 Cut the 5" cross bars into 1/2" strips.  Don't cut into the 2" square area in the center.

Strips cut

Fold the center square diagonally.  It will form the bottom of the bag.


Fold in the four strips closest to the bottom fold, to form a 90 degree angle.  They are the start of the sides of the bag.
 Starting with the lower left corner of the bag (front or back), fold it around to interweave with the back strips, going under the first strip.  Turn it over and repeat. 
Now weave the right corner.  If you look closely at the magazine photo, you can see that the right and left weave differently.  If you zoom in on this photo, I think you will be able to see it.
 This is how I folded the sides before weaving.
 Continue with the next row.  Start the weaving with the left side, wrapping to the back, and UNDER the first back strip (on the inside of the bag).  Flip over and repeat.  Weave the other corner, front and back.
Repeat with the next two rows.
I was able to weave four rows.  Tighten the weave and finish following the magazine instructions. 

The instructions didn't say anything about securing the weave at the top before cutting, but I would use a tiny dab of tacky glue or some double stick tape before cutting.


I hope my photos help frustrated weavers!

Thursday, October 4, 2012

Tension Box for Sectional Warping

My first experience using a tension box was when Bob and I wound my first warp onto the restored Weaver's Delight loom.  I didn't own one, since none of my other looms have sectional beams, so I borrowed a homemade one from a friend. 

Now, I have a whole box of rug warp, with lots of colors, and am ready to wind on my second warp.  I gave the tension box back to my friend after putting the first warp onto the loom, so I showed Bob what I needed. 

He drew up some plans, and when I came home from work this afternoon, he had most of it completed.

I found a wire coat hanger and made the two wire gates to keep the yarn from popping out of the tops of the open reeds.

Bob finished it after school.  He picked up some 1" dowel at Ace, and some wing-nuts, cut the four tension dowels and added the posts for the wing-nuts to tighten them.


I varnished the dowels, and have them drying on the box.  A light sanding of them tomorrow with super fine sandpaper, and it should be ready to try.  Now I need to decide what I am going to weave.  I did Chicken Tracks for the last run of rugs, so I will try something different this time.

Monday, September 10, 2012

Roll Out the Rugs!

Here is the roll of rugs fresh off the Weaver's Delight, and stretching down the upstairs hallway.  I'm taking the photo from one bedroom, and Bob is in the one at the end of the hall.  I haven't taken a measurement of them yet.  They turned out better than I expected, and the selvedges are great.

The roll from the other end.
Close-up of the first rug.
Close-up of the second rug.
The short rug for our bathroom by the shower.
The last rug.  Strips of four neutral colors, one with flowers and leaves that give the random splashes of color.
Sample using some of the left over weft, and the blue is blue jean strips.  About 3/4" wide is just about right for the strips.  The last little bit is just using some of my hem yarns.  Just a sample, or maybe I will use it on the table for setting hot dishes on it.

The excitement of getting them off the loom has worn me out!  Bed, here I come.

Sunday, September 9, 2012

Lessons Learned on the Weaver's Delight

The last rug on the first warp was finished tonight on the Weaver's Delight.  I really do love the chicken tracks pattern.  I'm hoping others do also, since I want to sell the ones that turn out well.
How satisfying to see a nice roll of rugs on the cloth beam.  They will have to wait until tomorrow evening to be removed, since I still have a bit of warp left that I will make into a sample. 
Along the way, while weaving this first warp, I learned some things about the loom.  This was my first experience with sectional warping, and it is obvious that Bob and I have to be a little more careful with counting rotations, as evidenced by the photo.  Oops!  That little bit left to weave will be my sample, and then I am going to undo the edge sections and finish up the warp with a couple placemats on the narrower warp. 

Also seen in the bottom edge of the photo are weights that I used on my last four edge threads on each side.  I'm hoping with the weighted selvedges, that I won't have wavy edges. 
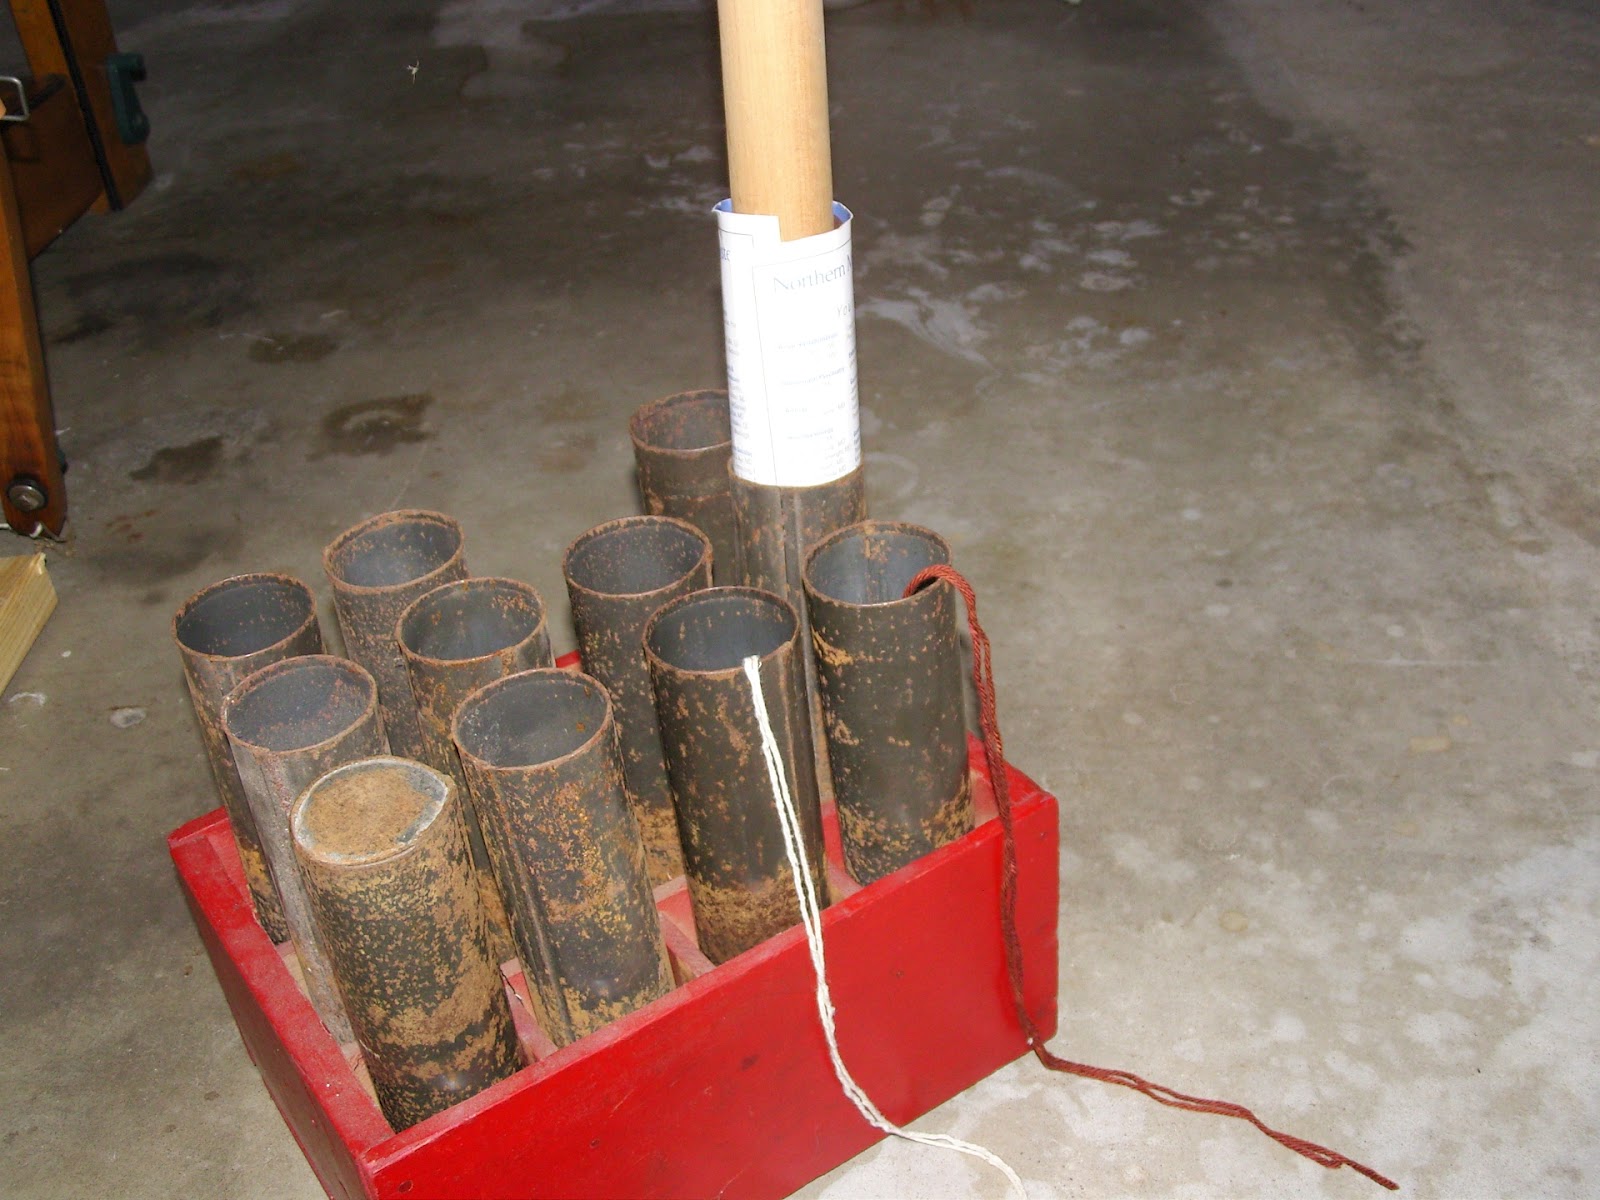
The canisters took a little getting used to to load them.  I didn't get a "pink pony" with the loom so I had to do it by hand.  I found a pretty thick dowel in the workshop to compress the weft material into the tubes, but it seemed to stick to the insides of the tube, so I tore the cover off an old phone book, and that slippery, heavy paper made it much easier to get the tube loaded.  As I filled it a bit, I pulled the paper out more, so I always had a deep tube.  My tubes are still rusty, but not so bad on the inside, so no, my fabric did not pick up rust.
The yarn poking out of a couple of the tubes makes good hems on the rugs.  It is about the weight of the Sugar and Cream type yarn used to knit dishcloths.  I use two strands and get a hem like the white and rust sections with the closer chicken tracks.  I do have an industrial sewing machine to sew the thick hems.  I could do it on my regular sewing machine with some special techniques, because the yarn is soft, but I don't need to, since the heavy machine is designed for that type sewing.  Chicken Tracks even makes a nice hem!
This machine travels!  The 2x4s on the floor were braced against the front corners, but they only help a little bit, and then I have to tug at the loom and move it back.  I actually think I need to brace it in two directions, since it tends to move forward and to the left.  I will have to work on that when I find a more permanent location for the loom.  Right now it is in the garage where my car will be this winter.
The tension adjustment on the brake band will determine how far forward the beater will come when beating the rug.  Much further back from the front post than this amount will start causing problems with the shed changing mechanism and the fly shuttle mechanism.
I have found that this distance is about ideal, but not any closer.
Broken warp threads seemed to be inevitable, so I quickly learned to leave plenty of extra warp on the repair section.  That way, I had enough to pull forward through the heddle and reed and could get the knots between rugs once I finished the rug I was on.  Leave enough warp behind the loom to finish the current rug, and enough to weave the next rug.  It will save headaches of having knots that you have to keep an eye on behind the heddles.

I like weaving rugs while standing.  I think it is easier on my shoulders, and the leverage is great.  I never missed the treadles even once!
 I thought I learned to keep an eye on the nuts and bolts, to make sure they stayed tight, and then I looked down at the floor, and the nut and washer under the tension rod was on the floor.  Before the next warp, I will have to go over the whole loom and tighten everything and oil all the moving metal parts.

Another bolt that I had to keep an eye on was the big bolt holding on the cams.  With the loom warped, it isn't visible, so it's an easy one to forget about.  It has to be pretty tight, or it will constantly come loose.

All in all, I think I had a pretty successful first warp.  I'm anxious to start learning more with my next one.


Sunday, September 2, 2012

More Rugs


I have mixed feelings about weaving rugs.  They weave fast if there isn't any variation to them, but I seem to be most attracted to the ones with stripes or more detail.  There is such a lot of prep work that goes into a nice rug, that it usually takes longer than weaving it.  Prepping is a lot of hard work, and some can be hard on the body.  My hands are getting pretty sore, so I may soon have to take a break and get back to finer weaving with just yarn.

Before I got the Weaver's Delight up and running, I put a warp on Fanny. This one ended up with stripes in both directions.  I was trying to use up some horrible old polyester doubleknit that I inherited.  The warp will definitely wear out before the weft does!  The majority of the rug is of a tan, gray, and white striped fabric cut about an inch wide.  The narrower accent stripes are navy blue and burgundy strips.  I cut them 1/2" wide and doubled them since these particular knits were kind of stiff.  They packed in better that way.  The red was twisted with the navy to give a little accent color.  This rug is getting close to being finished.  I haven't decided what will be next, but it may be one fabric, or one color with a twill variation.  Denim could be a possibility if my hands and wrists hold up to the rotary cutting.

I ran into a little difficulty today weaving this small rug.  This is the third rug I have made on the Weaver's Delight, and the manual warned about checking the bolts for tightness.  Things started to loosen up, and suddenly I couldn't make anything move.  Being new to the loom, it took me a bit of looking before I figured the trouble was with the "A" part needing to be scooted a little to the left, toward the "B" part.  I was able to complete the rug, but it started doing it again just as I was finishing the hem.  I will get back to it tomorrow, in the daylight, when I can see what I'm doing. 

Most of the rugs I am weaving are probably going to go up for sale.  Our church regularly goes on a mission trip to Kentucky every year, and they need to raise the funds for any repair projects they sign up to do.  Hopefully, I will have a stack of rugs before next years trip. 

I actually wove this rug for us.  We needed a small rug by the tub/shower that wouldn't cover the heat register on the floor.  The light colored fabric is a recycled mattress ticking.  I like how the striped fabric looks when woven.  The rest of the fabrics are from my large stash, chosen to match the colors in the shower curtain.  I'm determined to gradually whittle away at the many boxes of fabric upstairs in my studio.

The 8 1/2 yards of warp that I put on the WD is quickly coming to an end.  I will probably get one or two more rugs from it, and then I will probably try the plain weave cams on the next warp.


Sunday, August 26, 2012

Davey Weaves on the Weaver's Delight

My 10 year old grandson Davey was over to our house today with his mom and little brother.  He got a chance to try out the Weaver's Delight loom.  I let him weave the final hem on the second rug.  He got the hang of it quickly.

This is my first attempt at adding a video.  I took it with my daughter's phone, and just previewed it.  It is a bit blurry, especially if it is expanded, but I thought it was cute, so it's staying.  I am going to let Davey tell in his own words what he thinks of the loom.


He also told his mom that they needed to get a loom like it at their house!

Friday, August 24, 2012

Having Fun with Weaver's Delight Loom

The last time I wrote, I had a hem done for my first rug on the Weaver's Delight loom.  Since then, I have been too busy weaving to take time to write.
The hem that I showed in the previous post is is almost ready to roll onto the cloth beam, and the first rug is half done.
This is a closer view of the rug, which is called Double Seed, or Chicken Tracks.  This one was woven with a regular rug shuttle, since I was trying to adjust the tension.  The little crank at the right side of the loom is used to tighten or loosen the brake band.  I have found that just a quarter turn can make a difference.  If the tension is too loose, the beater ends up hitting the two front posts.  When it is too tight, the fell line moves too close to the beater, and it is difficult for the loom to change sheds, and for the fly shuttle to pass through the shed.

These were the three fabrics I chose for this rug.  I really like the mottled look the green check gives.  I had a lot of yardage of both the green and the black, so I was able to work with long strips of fabric without too many seams.  Each fabric was a little different in weight, so they were cut or torn at varying widths.  I used three strips of green, half a strip of black, two strips of the yellow print, half a strip of black, and they repeated three more times.

This first warp isn't very wide--only 24" in the reed, and the rug is weaving up at 23" wide, without using a temple.  The temple that came with the loom isn't that small, so I couldn't use it.  Here is a photo of it prior to fixing the missing prong and before it was cleaned and varnished.

I started weaving the first rug on Friday afternoon, a week ago, and had it finished that evening. 
A couple days ago, I started playing around with the fly shuttle, and just wove some short sections of thick yarn while I got the straps adjusted.  I had to tighten them a bit, but it didn't take too long.


When I got home from a half day at work today, I started cutting my next fabrics.
Here are the fabrics, and a few of my notes for this rug.  The long strips worked well for the first rug, so I'm using them again.  This rug has a hem of  black cotton which came from a recycled sweater.  The tan and black weave fabric is heavier than the black gauze type fabric, so they are cut different widths.  Once I wove one repeat, I was able to determine how many repeats to have in the rug.  This time, I used three strips of tan and half a strip of black.
The fly shuttle worked!  This rug is weaving very quickly.  The shuttles are cast aluminum, with a tube that looks like a car exhaust pipe.  They are kind of rusty, so now that I know they work, I will need to clean and paint them.
Here is a close-up of the pattern.
It is half done.  The remaining fabric is cut, and loaded into the tube, all ready to finish the rug in the morning.  It takes longer to prepare the fabric than to weave the rugs!

It's been fast and fun!

Thursday, August 16, 2012

Weaver's Delight Restoration is Finished

My goodness, it has been about three weeks since I last posted anything about anything!  Chest pains and low blood pressure have taken all my energy for anything but going to work.  I had a stress test done today, after seeing my cardiologist last week.  Hopefully I will get some answers soon, and start feeling better.

I have been taking some small steps with finishing the loom restoration during the last month.  The good news is that I started weaving on it today!
The pattern that I decided to try first is the Double Seed Rug, also know as Chicken Tracks, from the Rag Rug Handbook, pg 69.  I'm using a 12 dent reed, and I wound 27 ends per section.  The orange section was where I was spreading the warp and trying to get the tension adjusted.  The green is my hem.  Now I need to get some fabric cut.  I still need to clean up the shuttles and tubes for the warp, so this first rug may be hand woven with a regular rag shuttle.

The cast iron parts at the bottoms of the back posts are there to bolt the loom to the floor.  This photo is evidence of why they are needed.  The papers on the floor by the loom were halfway UNDER the loom when I started weaving.  The loom moved about 1 1/2 to 2 feet while weaving the warp spacers and the hem!  I am going to have to get Bob's help turning the loom and bracing it against the foundation with a couple 2x4's.


Sectional warping was a new experience for me.  The spool rack worked well as long as it had weight at the bottom to keep it from tipping over.  I needed all the threads to come into the tension box from a low position, so I ran them under a barbell.
I didn't use the little gadget will all the little holes that came with the loom, because I wanted my threads to go onto the warp beam in a certain order.  I had a short piece of rigid heddle with just the right number of slots and holes for each section.  It worked well for keeping the threads in order.  I wound a few of the sections by myself, but it was pretty hard, so Bob helped with the cranking for the rest of them.

 This shows the correct direction for the straps to wrap around the warp beam.  The buckle ends fall between two of the bars, so the knots don't make any lumps in the warp.  I wound every other section with five groups of three threads in red and four of tan, and then reversed the order for the other sections. 

I cut eight pieces of plastic tubing and slipped them over the pegs to help guide the threads into each section. It kept the warp from catching on the tops of the pegs.

Not having a brake band pretty much stopped any work on the loom.  I had ordered one, but the lady that supplies parts became very ill and was unable to send the part.  I called my good friend Lou, down in Arkansas, and he helped us out with some photos and dimensions for making one.  Bob was able to get some angle iron, rivets, and a steel band from the hardware store and made one.  We had some trouble with the rod that screws into the bracket not having enough threads when we used the spring that came with the loom.  Instead of making a whole new band that was a little longer, Bob just replaced the spring with a shorter one.  The position it is in in the photo is about where it should be with the tension tightened for weaving.  When loosening it to wind warp on the sectional beam, the rod is backed out almost flush with the bracket.


The straps on the loom were in very poor condition, and were wired together in spots.  I contacted an acquaintance of my daughter Becky, and he was able to make new straps.
These are the new short straps.
This is one of the two new longer straps that connect to the picker sticks.
It was actually raining in this photo, and shortly after, we had a downpour that lasted about 20-30 minutes.  Everything is nice and washed outside, and the sun is shining again.

Along with helping me with some of the heavier restoration things, like the brake band, Bob has also been working on a treadle stand for the old Leclerc Jano table loom.  Here, he is working on marking the holes on the lamms.  It should be nice with the little shelves on either side.  It's almost done, except for the lamms and getting some finish on the wood.