Wednesday, December 10, 2014

Tensel / Silk Scarf

After ten and a half months, I finally took this scarf off my Leclerc Artisat loom and finished it just in time for our weaving guild challenge, Fine For Me.  Everyone was challenged to weave something with yarn that was thinner than we ever used before.  Our guild has members with a wide range of experience, so it is going to be interesting to see the different items next Monday when we meet.

The finest yarn I used previously was a 20/1 linen.  I had to use something thinner than that, so I used a yarn that had been in my stash for quite a while.  It is a blend of 80% tensel and 20% silk and is quite shiny and a light eggshell color.
 This yarn is sett at 40 ends per inch and my scarf  was 8" wide on the loom.  That is a lot of tiny threads but hardly made a dent in my cone of yarn!

To keep it in control as I was putting the yarn on the loom, I used my pair of "angel wings" to keep the threads from tangling.  After measuring the yarn, I slipped the two dowels in the cross, which keeps the yarn in threading order.  The warp went on the loom without any problems.  I think the key to that is keeping tension on the warp while winding it on the warp beam.
The pattern I chose is from Marguerite Davison's book, A Handweaver's Pattern Book.  It is called Kay's Design, on page 144.  It is an overshot pattern, which requires two shuttles, one for the tabby (plain weave) background yarn and another to weave the pattern.  The pattern yarn is traditionally a thicker yarn than the warp and tabby yarn, so I utilized my double bobbin shuttle to weave two strands of the tensel /silk at the same time.  It works much better than to try to wind two strands of yarn on one bobbin.

I started off with a sample to check the pattern for errors before I started the actual scarf.  I could tell right away that the scarf was going to take FOREVER to weave!  I think I figured out I had to make 72 passes with the shuttles to weave an inch.
I hemstitched at the beginning and end of the scarf because I wanted to twist the fringe to help keep it from tangling and fraying.  Click on the photo to enlarge it to see the detail.  The hemstitching helps define the bundles that will be twisted and also holds the initial woven threads in place.
After weaving 60", I called it quits, finished the hemstitching on the other end and cut the scarf off the loom.  One end was finished and I was just getting started twisting the fringe on this end when I took this photo.  Each clip has four threads for a total of twelve for each fringe.  I was glad I hemstitched because it made it so much easier to separate the bundles.
The fringe turned out pretty nice and just a shake untangles it.
After the wet finishing process, I pressed the scarf to set the yarn.  I am not real happy with how flat it looks and am thinking I might try steaming it to see if I can raise the pattern threads a little.  I liked the look of it better before it was washed, but the wet finishing improved the softness and drape of the fabric.

If you look closely at this photo, you can see the slight bit of color from the Sulky rayon machine embroidery thread I used for the tabby yarn.  It is variegated pastel colors and the blue shows the most.  I wouldn't use it in a project again because it was so slippery and curled up a lot, especially toward the end of the bobbin.

I finished up my records and draft to share with my guild, but needless to say, there will be no samples to give to anyone!  Now I need to get my crackle project off another loom, write up those records and possibly weave some samples.  I should have some photos of that Christmas runner project soon.

Friday, November 21, 2014

A Years Old Project Finally Finished


Several years ago, probably about seven, I decided I wanted to learn how to knit socks.  There were so many pretty sock yarns to choose from, so I picked out this pretty Panda Wool bamboo blend yarn, not realizing it wasn't the best choice for an inexperienced knitter.

Between my daughter Becky and my friend Kristy, they got me started on the new experience of knitting with double pointed needles in a small size.

I was able to knit the cuffs once I had some instruction, since it is just getting used to knitting around in a circle times two (socks).

Then came the heel.  I am a slow knitter, so I wouldn't get very far at any one time.  Heels involve things like increasing and decreasing and I for the life of me could not remember how to do it the next time I picked up my knitting.  They I would have to wait until an experienced knitter was around to show me, AGAIN!

I finally finished the heels and was able to do some easy knitting again for the body of the foot.  I would do a little on one sock and then repeat it on the other sock, so they would both stay at the same stage of progress.

My friend moved away so by the time I got the socks long enough, I needed instructions again for decreasing the toes.  My daughter doesn't think she is a good teacher, even though she is, but I hated asking over and over again for the same instructions so I stashed them away for several years. 

I recently decided if I was going to be active with our local spinning fiber group, I should at least finish this knitting project.  I took the socks to the meeting at the beginning of this week and got the help I needed (from my daughter) to finish the decreasing on the toes.  I wrote down the steps, brought them home and finished that step.

All I had left to do was the Kitchner stitch to close up the toes.  I found a few You-tube videos today online, watched them and completed my first pair of socks!  Hooray for me!
The cuffs could have been a little taller, but I am pleased with them, and they are nice and comfy.


Thursday, October 30, 2014

Rosepath Rag Rugs

I realized a few days ago that I need to do some catch-up with blog posts.  I originally started this blog to keep a record of my weaving projects.  I was finding I didn't even remember a lot of them until I ran across photos as reminders.
Tina Ignell's book, Favourite Rag Rugs, has some beautiful Scandinavian rug projects.  One that especially caught my eye was the Rosepath pattern.

I started my first one using a variety of cotton and rayon fabrics from my stash.
The light blue background fabric to the rosepaths is a sheet that I dyed using the snow dye technique.  I also used the same technique for the wider light green bands.  The pink is rayon, and after using it, I would say it wasn't the best choice, since it tends to fray easily.  The turquoise and black were a gauzy cotton.
After finishing, it went to my granddaughter Peyton for her birthday.
I was quite excited about this one.  The dark mottled stripes are from a cotton printed velveteen, the tan stripes are wide wale corduroy, sewn together with the nap in opposite directions to give a varigated look to a plain color fabric. The narrow red dotted stripes were from a striped fabric.  The rosepaths were six different colors of linen fabric with a background of a light cotton.  I was very pleased with how rich it looked when completed.  I decided to keep it, and my cats really like it too.  It is great for rolling on to get tummy rubs.
Click on the photo for an enlarged view.
This is the start of a polyester doubleknit rug being made as a gift for a friend's kitchen.  The warp will probably wear out before the weft, since that type of fabric wears like iron.
Completed using black, grey, red and white.

I have one more rug on the warp to complete, but it is at a standstill, hoping I can come up with the "right" colors for another granddaughter for a bedroom rug.

Monday, October 27, 2014

First Project From My Eight Shaft Loom

After quite a bit of work to get my eight shaft loom (a copy of a Gilmore loom) completed, I finally took the first project off and finished the hemming today.

I chose the pattern Butterflies in Clover from the Sept./Oct. 2014 issue of Handwoven because is was a single shuttle weave with a fairly simple treadling.  I was able to weave four towels and a couple short dishrags from the five yard warp.  I used 8/2 cotton.  The pattern called for thinner yarn, and I think it would be better than the 8/2 because there are a few floats that are a bit longer than I care to have due to the chance of snagging the yarn.

The warp is tan.  I was looking for an antique look, and I think that color warp was just right.  I had several starts and stops and redo's before getting the treadling order straight in my head.  The first towel completed was woven with dark red.
Teal was used for the second towel. I hemmed it so the reverse side is visible. 
Navy was used for the third towel.
I wanted to use three different colors for one of the towels, so I decided to change the treadling.  This one is woven with 8/2 dark brown cotton and 22/2 cottolin in lime and orange.
The reverse side looks different with this towel also.
 This is my treadling for the brown, green and orange towel.  I separate the first and last four twill treadles with the tabby treadles in the center.  For me, it seemed to help with fewer treadling mistakes.  The tabby is not a true plain weave.  Make note of the tabby used in the hems.  Photos can be clicked to make bigger.
With just a little warp left over, I wove off the rest in medium dark green.  I like to use my samples for dishrags rather than storing them away in a box. 
My finishing process is to serge the ends of all the towels, wash in hot water with Dawn dish detergent to remove oils.  I wash again in the washer with hot water and laundry detergent, stretch both lengthwise and crosswise to remove wrinkles from spinning in the washer, and then dry on a normal temperature in the dryer.

After drying, I dampen the towels and stretch them again right before pressing with my Steam Fast steam press.  The press is a great time saver. 

I then turn the hems and steam press before stitching on the sewing machine.  After sewing, the towels get another final press.


Saturday, September 13, 2014

Aligning Metal and Wire Heddles for Efficient Threading

I never thought too much about my heddles on my looms until I started restoring a couple looms and again a few days ago while helping a friend thread a loom. There is a definite difference in how to install them depending on if they will be threaded left handed or right handed. 

It pays to check the loom before threading so any changes can be made ahead of time.

These are an example of typical wire heddles.  Enlarge the photo to see the direction of the angle of the eye.  These are installed for right handed threading.  The eye slants from front to back, left to right.  Because of the direction of the slant, it is more difficult to thread by someone who is left handed.
By flipping the heddle end to end, you can change the threading direction to left handed. The angle slants in the opposite direction (front to back, right to left).

It pays to watch which direction the eye is facing when putting heddles on the loom. When I was helping a friend thread a new-to-her loom, one shaft had the heddles backwards with a left handed angle, which made it awkward for threading and slowed the process. I have noticed it on a couple of my looms also. I think it is worth the time it takes to fix them and will do that the next time the looms are empty.

 Here are a few heddles from some of my looms.  From the left, the first one is an inserted eye heddle.  The second is a wire heddle.  The third is a stamped metal heddle and the one on the right is a Leclerc repair heddle.  They all have some differences to distinguish front and back or right and left handed.  They don't come designated right or left.  That is determined by how they are installed.
The inserted eye heddle has a slight bend near the top and bottom.  Flipping it side to side will not change the eye angle.  To change from right to left, the heddle must be flipped end to end.  The bends on the ends won't really help much for determining which end is up, so the best thing is to hang one end loop on something stiff and see which way the eye angles.  The chenille wire works well because the heddles don't slip off the wire.
The other wire heddle is like the inserted eye heddle above, with nothing to distinguish the top from the bottom.  Hang them and adjust the eye angle.
 The stamped heddle is the easiest to determine left and right, because the top and bottom loops are different. One end is straight.
The other end has a wavy top.  Line up the wavy tops in the same direction and the eyes should all line up correctly.  Decide if left or right threading is what you want and install with the wavy side up or down, depending on your choice.  Just make sure they are all the same.
This the end of the Leclerc repair heddle.  I love them and have several.
They slip over the heddle bars easily.
Just make sure the eye is facing in the proper direction for threading, just like a normal heddle.

If a whole shaft has the eyes backwards, it can be an easy fix in a lot of cases by just flipping the shaft frame over, just like flipping one heddle over to change eye direction.

Many weavers are not aware of these differences and can't figure out why threading the loom doesn't go as smoothly as they would like.  Take the time to fix the eye direction one time and have years of easy threading.  It will be worth it!


Wednesday, September 3, 2014

A Question About My Rag Rug Techniques Post

Judy wrote to me with a question:

You said you thread your edges 4-4-3-3, but you weave raising 1&2 together and 3&4 together.  Doesn't that leave your edges without warp threads on the underside?

Judy Klineburger

Here is my answer, in case others had the same question.  Here is a close-up photo of what she is asking about.

Hi Judy,
Sorry it took me a while to be able to reply.  I had to go back onto the May 23, 2010 blog post, Rag rug weaving tips, to see what I said and then look at old photos to see if I had anything I could show to you.  I ended up taking a close-up photo of one of the rugs from that particular warp.  Using that technique, my hems are plain weave, 1-3 vs 2-4, which will have each thread separate except the last four edge threads, which will be doubled.  When I get to the body of the rug, I weave 1-2 vs 3-4.  You are right about the four edge threads all rising or sinking together, acting as one thick thread.  They will alternate with the next two warp threads.  Take a look at the attached photo.  I tried to separate the weft a little right above the red so you could see the four warp threads that the weft is wrapping around.  If you don't want to raise four threads together, you could change the last two threads to shaft one or two.  The best thing to do is just try it both ways and weave the one you like the best.  It is simple to untie the last bundle on each side and re-thread the last two warp threads.

Sunday, August 17, 2014

My Second Rescue Loom

We hear all kinds of stories about rescue cats and dogs, and that is a good thing.  It is good to bring attention to unwanted animals.  Our cat Schwartz came from our local shelter.  But I think it is time to bring attention to old looms.  Too many of them become kindling for someone's fire because the person that owns the loom doesn't know anything about them.

Bob and I just finished rescuing a second loom.  My first one was my Weaver's Delight from the Newcomb Loom Company.  I detailed my restoration of that loom in previous blog posts.  This second loom, a copy of a Gilmore loom, could have been a big mistake for us if we both weren't so persistent in getting it working. 

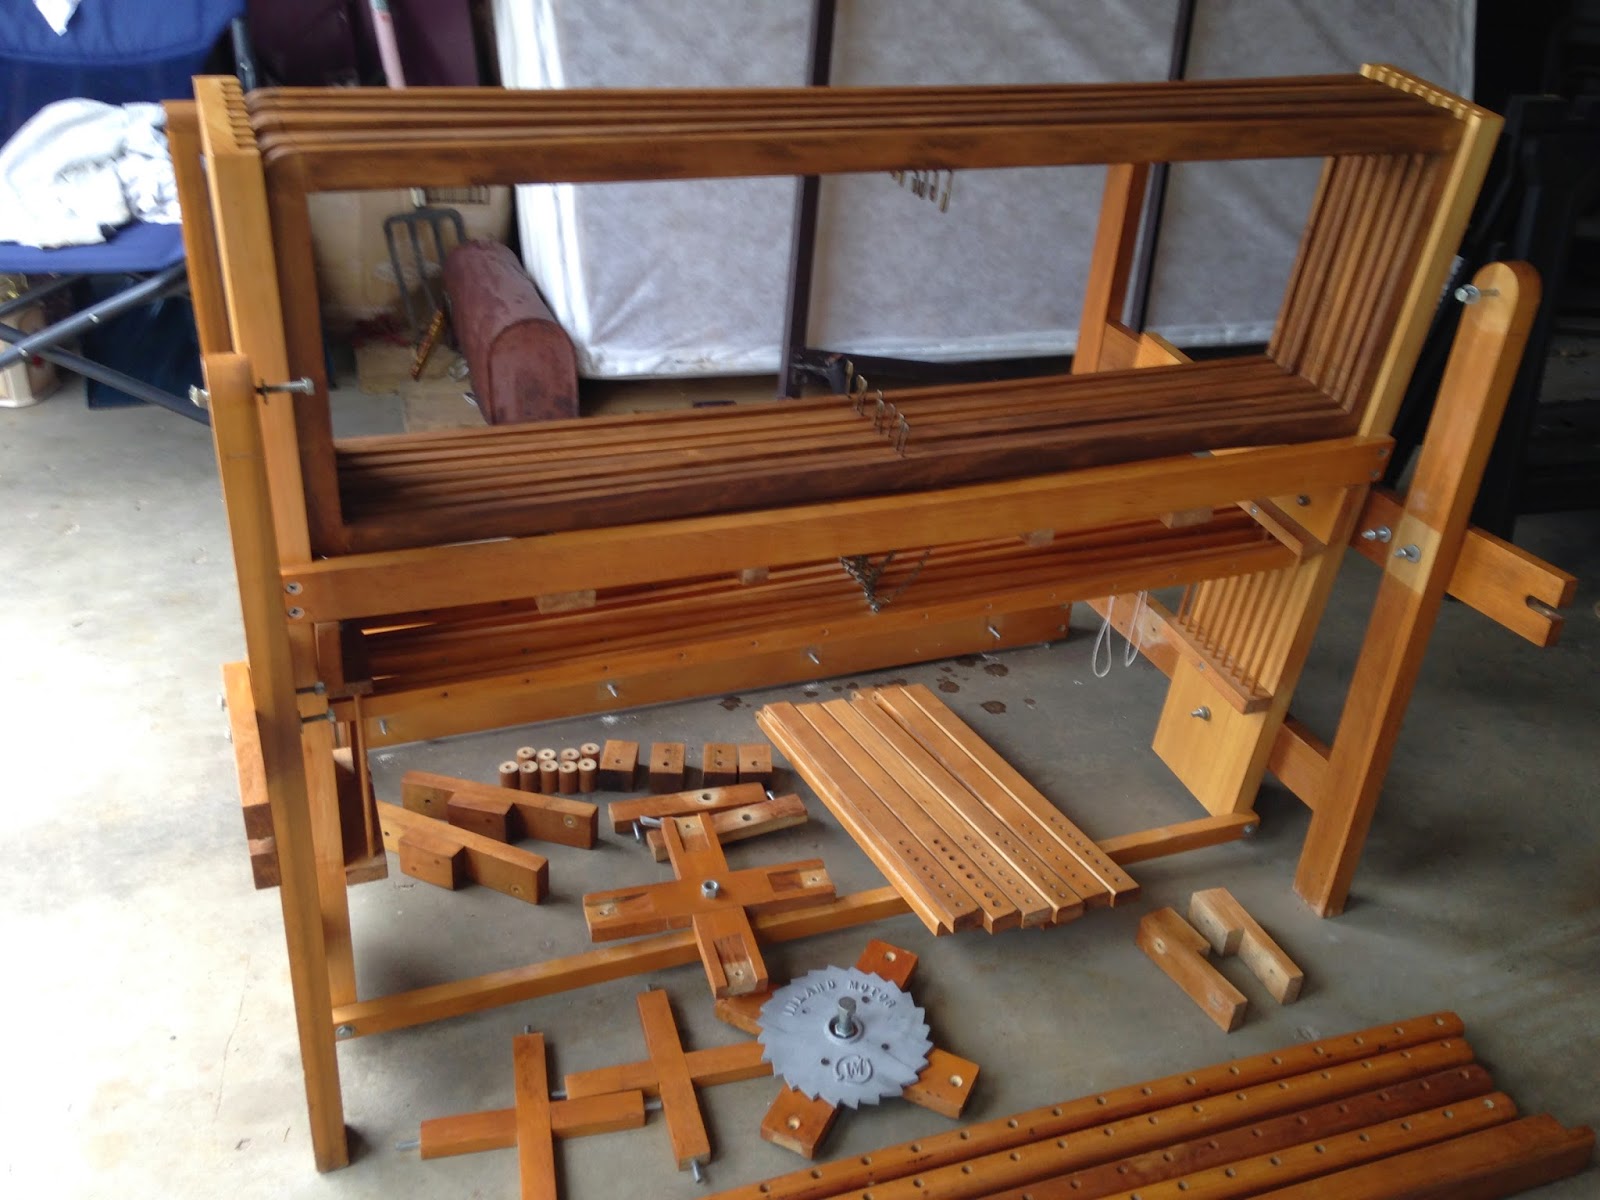
This is sort of how it looked when we bought it. I didn't get a photo before I started taking it apart. I sanded the frame but no finish was added yet. 

I purchased it without really thinking it through because it was an 8-shaft loom and the price was right.  I didn't have a loom with 8 shafts except for a table loom. Although it is a nice Glimakra Loom, I don't care to weave using hand levers because they are too slow for me.

Unfortunately, the other owner purchased it not knowing is was never gpomg to be a functional loom for her.  She said the person she got it from told her it was a kit.  That "kit" was not all there, lacking some very important parts.  A loom needs a brake and warp advance system and this loom was missing that.
As I started taking it apart, mainly to get some new finish on the wood, I kept seeing more problems with it.  I contacted Bob at the Gilmore Loom Company  to see if the loom could possibly be a Gilmore.  It turns out is was sort of a copy, but Bob was very helpful anyway.  I was able to get the proper ratchets and a few other parts for the brake system and he showed us how to make some other parts and how to install them.
This notch was an oops, but doesn't affect the integrity of the frame.  It was cut to try and attach the advance lever.  It should have been attached to the cloth beam, but the hole wasn't big enough to go over the beam end pin.  Bob had to drill a bigger hole to install it properly.
 This thin ratchet was what came with the loom.  It looks homemade.
We replaced the thin ratchet with this sturdy one and added the back pawl, which both came from Gilmore Looms.
 At this point, I wanted to get a sample warp on the loom to see how my treadle tie-ups were working, so I put on a short 2" wide warp, put a weight on the back beam so I could get some tension on the warp and proceeded to weave a small amount as I adjusted the treadle tie-ups.
My little sample worked out, so I knew we were close to having a functional loom.  About all that was left to do was get the brake installed.
This is part of the brake system with the new replacement parts, also from Gilmore.  Bob made our own metal bar to catch on the ratchet.
Our son Edwin welded a part that needed to be screwed to the inside of the sectional beam to keep it from spinning. 
A treadle was added to release the brake in the back.   By this time, I just wanted to get the loom up and running.  I might get around to putting some finish on it someday.
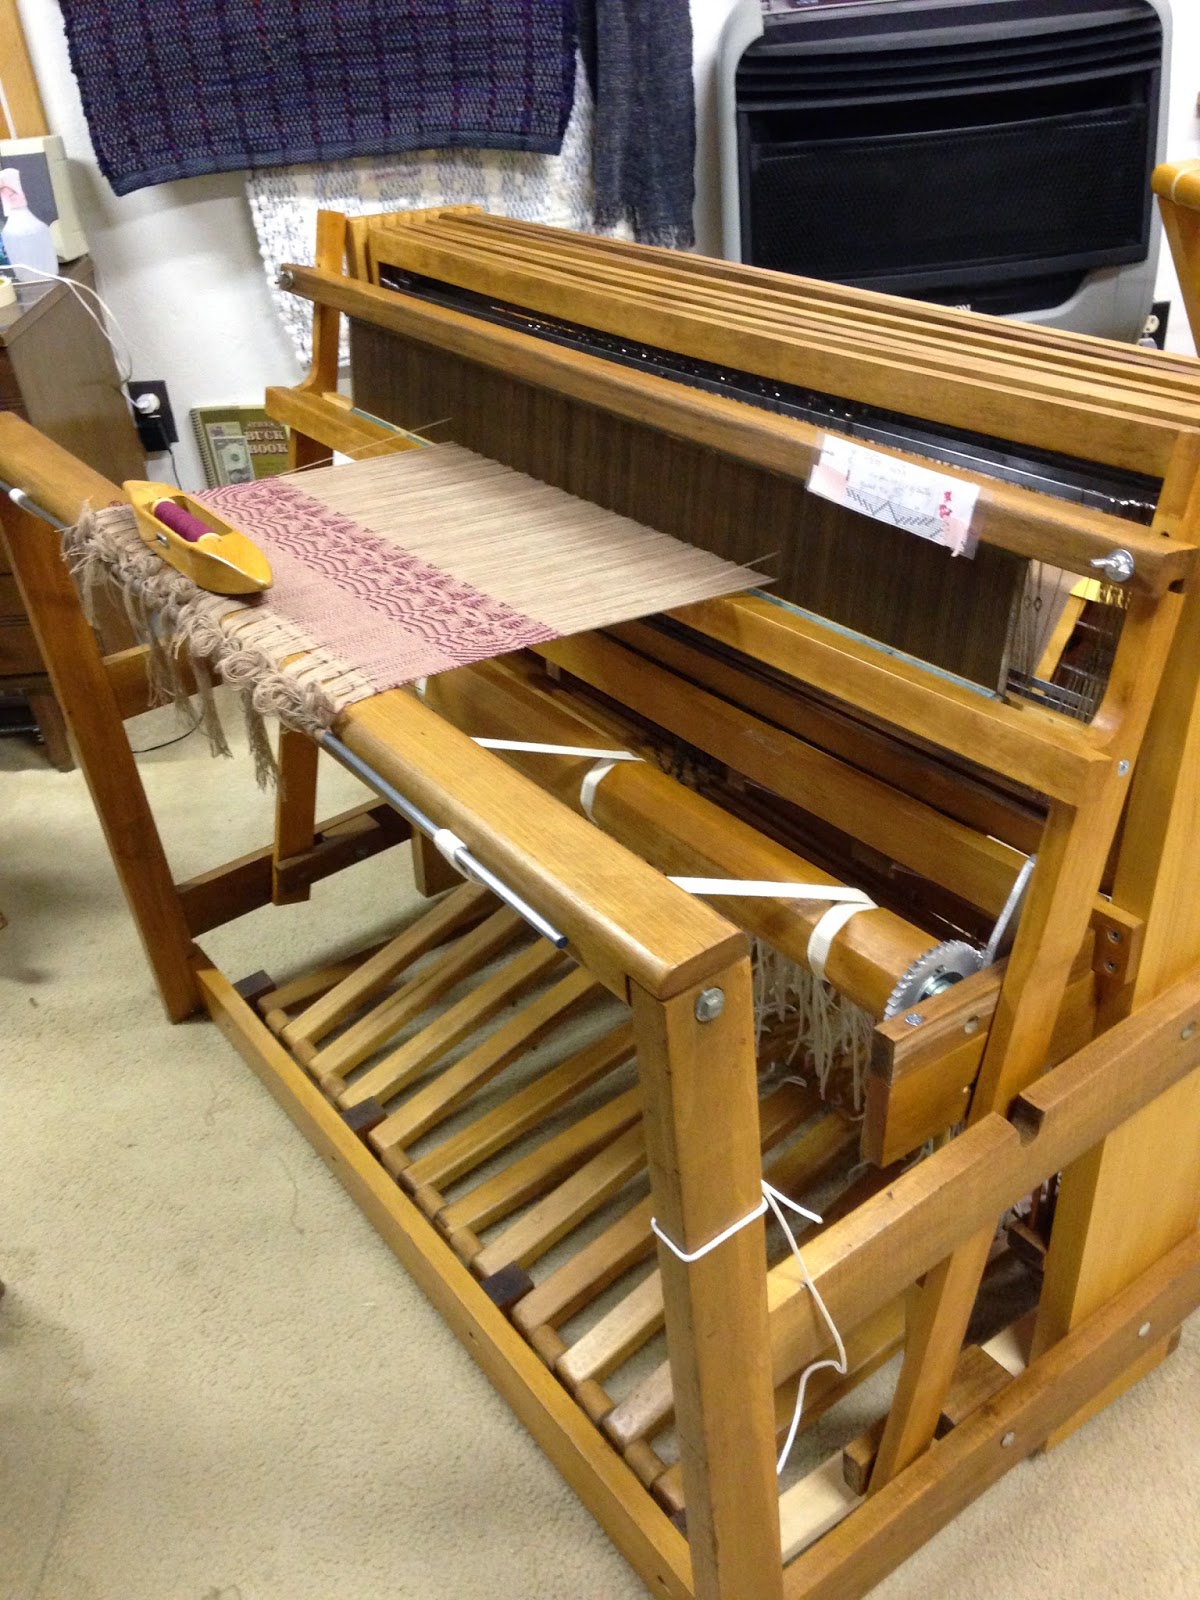
 We moved the loom into the studio and I picked a project that would only take one shuttle from the Sept/Oct 2014 issue of Handwoven.  I propped the shafts up on a box to get the heddle eyes a little higher for threading.
Here it is with the start of the loom's very first project.  This is just a sample to check for threading errors.
As hard as I tried to thread it error free, I still had eight threads near the end on the right that I accidently reversed the order, plus I had a weaving error.  I find if I weave a small amount and then take a photo, I can spot errors much easier than just looking at the weaving.  A photo just makes the errors pop out.
I loosened the tie with the errors, pulled the eight threads, rethreaded them in the proper order and retied.  The green stripe is my test after rethreading and it looks fine.  I will go back to using the red when I start my actual project.

I have about five yards of warp on the loom, so I should be able to get 4-5 towels woven.  I like the antique look I get from using the tan warp.  I plan on weaving towels in dark red, navy blue, dark green and whatever strikes my fancy for the remainder.

Another loom has been rescued and doing what it was intended to do and I now have an eight shaft floor loom with a 40" weaving width for about $500.  It feels good!