Friday, December 31, 2010

Tips for Rag Rug Hems, Additional photo

In May and August, 2010, I wrote two entries with rag rug tips.  When reviewing my instructions today, I realized I should have had a photo showing my method for weaving the hems for rag rugs. 

Like many others, I dislike fringe on my rugs because they gradually wash away in the laundry, especially with cotton warp.  I prefer to weave about three inches in plain weave (1-3 vs 2-4) at the beginning and end of my rugs, so I can fold a hem about 3/4" to 1" wide.

When I first started adding a hem, I had the problem many other weavers have, with the hem drawing in much narrower than the body of the rug.  I do a lot of reading, and came across this tip, and it solved the problem:

Instead of weaving the hem like I weave the body of my rug (1-2 vs 3-4, giving me doubled warp threads), I use tabby.  Instead of angling the weft in the shed, I arc the weft, and throw a few bubbles in for good measure (see photo).
It gives a stretchy hem with very little draw-in.  By the time an inch is woven, the weaving at the edges will even out a bit.  The first inch doesn't matter too much, since it is folded into the hem and won't show.  Play around with the arc size and the amount of bubbling till you get a hem that isn't drawing in. 

Sewing the hem takes some other techniques, but I will have to save that for another time, when I have a rug finished and ready to hem.  My technique avoids broken sewing machine needles.  Stay tuned.  Happy New Year!

Sunday, December 12, 2010

Davey Finished Weaving His First Project

 I am so proud of my grandson Davey.  He is eight years old, and when he came for a weekend at the end of November, we did some weaving.  He had been practicing on the rigid heddle loom, and was doing a great job, so I thought he was ready to start a pattern on my little four shaft loom. 

Here he is demonstrating the proper way to hold a shuttle.  He is doing very well throwing it through the shed and catching it.
Davey finished weaving today.  He is pretty proud of what he made.
I showed him how to wet finish it in hot soapy water till the water looked clean.  After rolling it in a towel to get most of the moisture out, he straightened it out on the counter and rolled it hard with the marble rolling pin.  It is hanging to dry now.  Hemming will be tomorrow after I get home from work.

Monday, December 6, 2010

Sampling Wool - Angora Yarn

As part of my stash reduction, I picked out a yarn that I thought would make a nice little handbag.  I purchased two cones of wool mixed with angora yarn at an estate sale a while ago.

I got out my notes from a Magic in the Water workshop that I went to a while ago.  We made several samples with different wools, so I was able to compare my yarn with some of the yarns we used in the class.  Mine was similar to one that was sett at 10 epi, so that was my starting point. 

I checked out the shrinkage and decided that 10" in the reed would work.  I liked it already, since that was only 100 ends!  I wanted to make about six bags, plus have some to play around with, so I measured out about ten yards.  On the warping reel, it went quickly.

It was important to see how much the fabric would full, so I wove off 24" and cut it off the loom.  Staying up way too late last night, I did the wet finishing.  I agitated it by hand in hot soapy (Dawn) water for about 4-5 minutes.  I changed the water a couple times so the water would stay hot.
The sleazy cloth that came off the loom measured 9" W by 21" L without tension.  When the fulling was complete, I measured the sample again.  This time it was 8 1/2" by 18 1/2" L.  I could tell that it was going to be soft, even though it was still wet.  I heat set it by pressing between a couple towels.  After the pressing and air drying, the final measurement was 7 3/4" W by 18" L, for a loss of 3" in the width and 6" in length.  Definitely a cloth to dry clean or gently hand wash in cool water.

When I got up this morning, it was dry, and so soft. Notice the fine angora hairs on the edge.  The whole cloth has a halo.   It was no longer a sleazy texture. 

I plan on trying some other weaves and some experiments with dyeing using Kool Aid and Wilton food colors.  Here is a link to a description of the process:  Dyeing animal fiber with Kool Aid and Wilton food coloring

If it is not too hard, I will have a good project for grandchildren.

Sunday, November 28, 2010

More Stash Reduction

I know I am calling it stash reduction, but when I look at my stash after completing a project, it doesn't look like anything has changed!  I suppose others experience the same thing.  I can say though, that the recent projects did not involve buying anything new, and some of the materials were given to me.

The first project was a set of six placemats that I started a while ago.  I have a huge cone of fairly heavy cotton yarn that is dyed a varigated dark blue to white.  I have used it a lot, and the cone still looks big.  When our son Edwin told us he was getting married, I set to work finishing the placemats for Rebecca's bridal shower.  Her favorite color is blue, so it was perfect for her.


The weft yarn was from my vast stash of fairly heavy cotton yarn that was given to me a couple years ago. Both yarns used in this project have been used many times for teaching children to weave. It's a great weight for making a project weave quickly, and still end up with something that is usable.


My eight year old grandson, Davey, spent a few days with Grandma after Thanksgiving Day.  He had been doing some weaving on a rigid heddle loom, and was quite meticulous with his work, so I thought he was ready to move on to a four shaft loom. 
There was warp left over on the placemat loom, so we looked in the Davison book for a few choices for him.  Since it was already threaded 1-2-3-4, he decided on a 2-2 twill that reverses direction with color changes.  We decided that some white yarn and some different colors of green yarn that I had left over from another towel project would work well. 
 I only got videos of him working on the four shaft table loom, but I did get a couple pictures of his work.
His selvedges look great and he is being pretty consistant with his beat.  He was easily distracted though, so he only got a little bit done.  Guess Grandma will have to have him over again soon!


While Davey was weaving on his project, I finished up a rag throw rug made with wool fabric strips that a friend gave me.  It was a design as I go type rug, with the stripe width being determined by the amount of a particular fabric.  There were several different plaids and a few plain fabrics.  I decided to seperate the different plaids with plain strips.  To add a little interest to the plain fabric area, I twisted two colors together.  That was ok for a couple rows at a time, but I wouldn't want to do a whole rug like that because the twisting takes too long.
I am pretty happy with how it turned out.  After putting it down on the floor, I thought the colors would look nice in our bathroom, since the colors are similar to the colors on the "rustic" shower curtain.
 With the rug done, I got back to the linen warp and wove another towel.  This is still from pg 39 of Davison's book, weaving version II.  It is a single shuttle pattern, and goes very quickly.  Since I used a cotton varigated yarn with slubs, the pattern isn't real distinct.  It shows better on the closeup photo.  The yarn is varigated blue, turquoise, green, and lavender. 
Hopefully I have enough warp for at least one more towel.  I think I will do this version again with a solid color yarn.


All in all, I think I had a pretty productive last few days.

Wednesday, November 24, 2010

Question About Threading Front to Back (F-to-B)

Sharon asked me why I used a raddle to thread my linen warp if I was threading F-to-B.

Actually, I didn't use the traditional method of threading because all I had was a large bundle of warp threads, about 4 yards long.  It was cut at both ends and there was no cross.  This would definitely be considered slow cloth!

Sharon, this threading was kind of a hybrid of front to back.  I used a raddle because I started with threading the heddles first from the center out to each side.  I put lease sticks in behind the heddles and threaded a cross with it as I was threading the heddles.  I tied the warp to the bar on the back beam, and then counted the correct number of ends per inch in the lease sticks and placed them in the raddle.  I did that from the center out to the sides also.


 I didn't sley the reed till I was all done beaming the warp, so the raddle was used to keep it the correct width.  The tow linen was so sticky, I didn't want more than one thing for it to catch on.

I don't usually thread f-to-b, although that is how I originally learned (from Deborah Chandler's book).    The multicolored warp with lots of pattern changes that I did for towels a while ago needed to be threaded that way.

If you haven't finished threading your loom f-to-b, find a way to weight your warp as you wind it on the back beam.  You can weight it in several bundles, as long as they all have the same amount of weight.  Stretch the warp out a ways  from the front of the loom to keep tangles to a minimum. Slap the warp to seperate any tangles.  Don't pull on individual warp threads.  Good luck.  I'm looking forward to seeing pictures once you get going on the weaving. 

To see Sharon's blog, go to: In Stitches

Sunday, November 14, 2010

Linen Towel Project

This week, I have been working on using more of my stash.  I purchased quite a lot of yarn at an estate sale a while back, and one of the things I bought was a large bundle of linen that was a cut off warp with no cross.  It was about four yards long, and a mix of a plyed smooth linen singles and tow linen singles. 
It's a good thing I am not a production weaver, because it took forever, or so it seemed, to get it on my Leclerc Artisat loom. 
Because the tow linen was so sticky, I decided to thread front to back so I could control the tangles better.  I worked with small bundles of pattern units and threaded the heddles first.  I wanted a cross, so as I threaded each bundle, I put the ends over and under my lease sticks attached to the back beam.


Once I threaded the heddles, added two floating selveges, and tied onto the backbeam, I was able to put some weights on the warp ends.  I moved the lease sticks to the front of the loom and worked it slowly toward the end of the warp.  The yarn was soooo sticky, and I was beginning to hope I wouldn't have to ditch the project.  Patience! 

It paid off!  But very slowly.  No warps broke while winding on the back beam. 


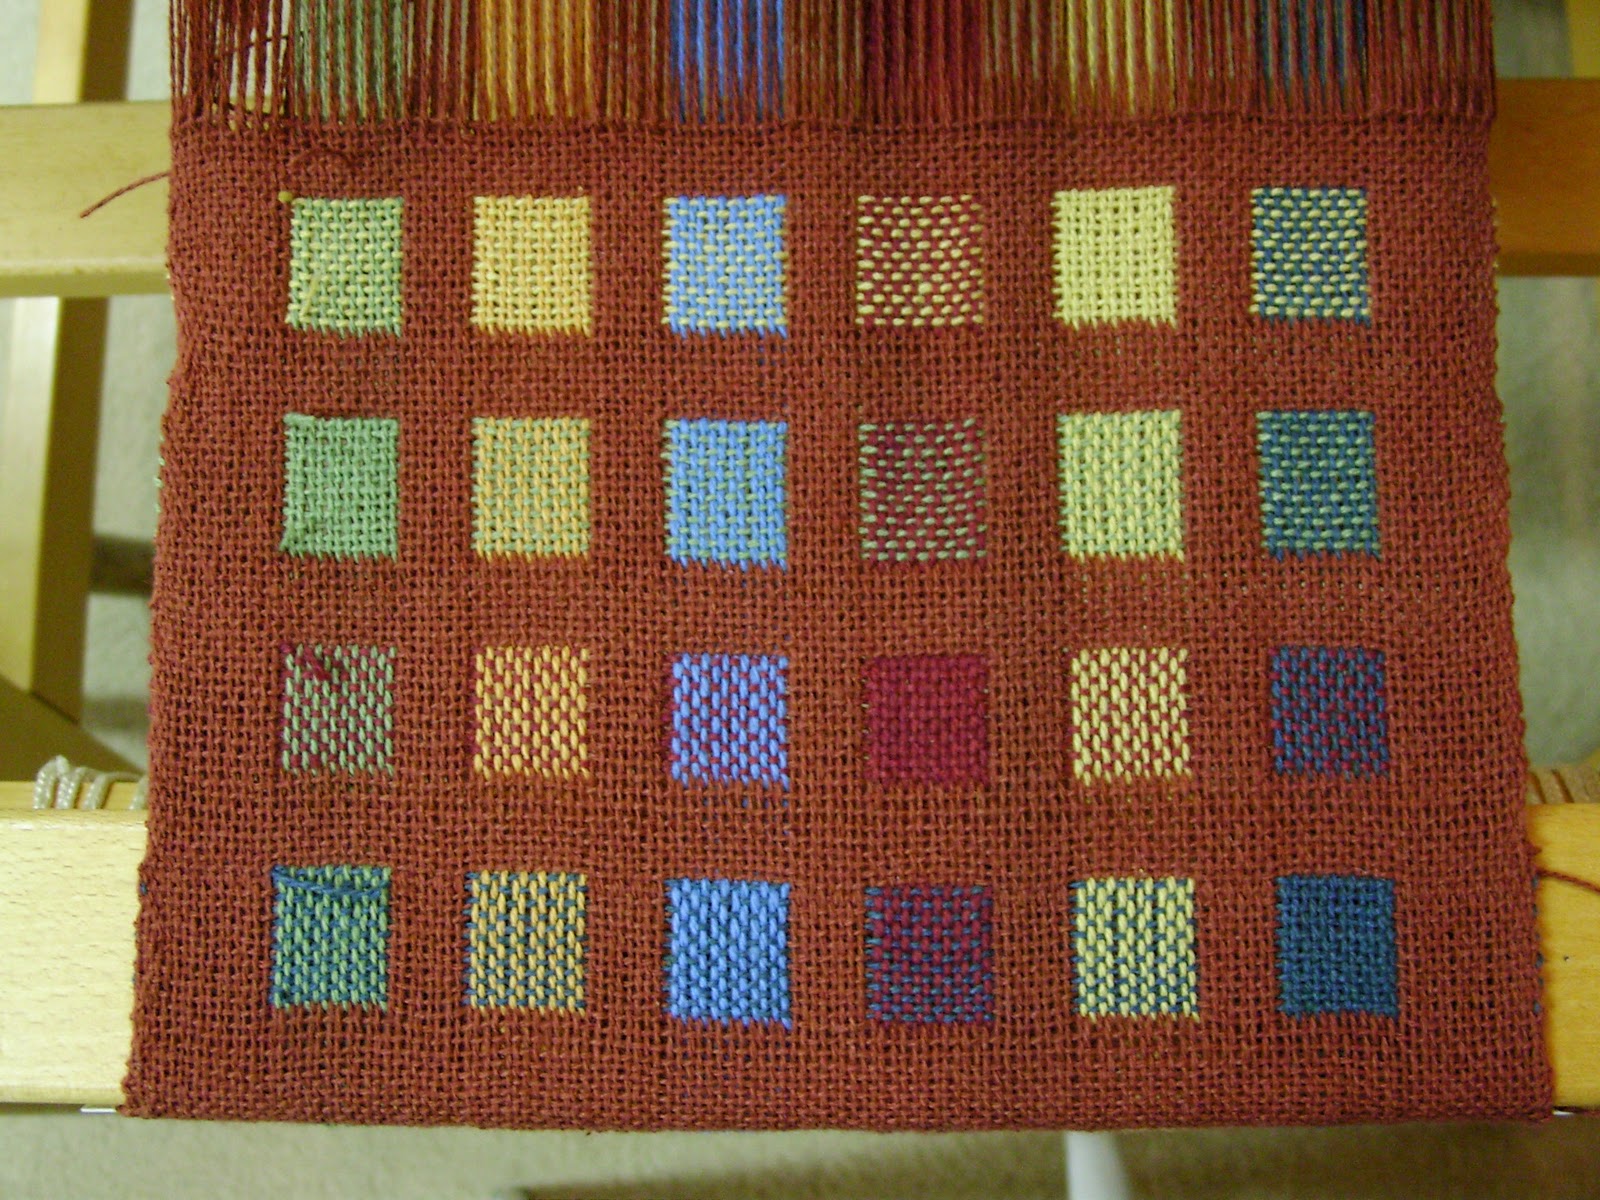
The warp is spaced 25 epi in a 15 dent reed.  It is sleyed 1-2-2.  The first dishtowel I am working on is mainly plain weave, with a border at each end.  The threading came from Marguerite Davison's book, Twill Miniature, on pg. 39.


 I'm using the first half of treadling #1 for the borders, with a little bit of plain weave between them.  With no tabby for this version, the weaving is going quickly.  So far, with tight tension, I have had minimal warp sticking together, but have had one broken warp thread so far. 


The weft is a turquoise blue 6/2 cotton, and seems to be working perfectly with the sett of the linen.  I love it when my guess turns our right the first time.  I wasn't planning on a towel with borders, but as I was spreading the warp and testing for correct threading, I kind of liked the look of it.  It is pretty typical of me changing the pattern in some way after I get started.

I use the Golden Ratio to determine the length of the towel and then use adding machine paper for a weaving guide to my towel length.   I can mark where the first borders are, and then mark where they should be on the other end of the towel.  Once the towel gets wound onto the front beam, I can't look back at what was woven.  I tend to get interrupted while weaving, and then forget what I did at the beginning, especially since I'm not a cookbook type of weaver.  My adding machine paper has saved me many a time, since I write a lot of notes on it, along with the inch marks.  It gets pinned to the edge of my towel while weaving with two pins.  It is kept loose, so I can see the whole length of the tape.  I use it again for the next towel if I am weaving something similar.
I'm hoping to get 3-4 towels out of this warp.

Monday, October 25, 2010

Back to Weaving

After a bit of time off, I am back to my looms and it feels good!  On October 12, 13, and 14, I took a trip downstate to attend a doubleweave workshop with a weaving friend.  It was taught by Jennifer Moore.  I had more information crammed into my brain that I will ever be able to use!  It was a great class. 
The class was run in a round-robin style, with everyone bringing their loom warped with an assigned pattern.  There were close to 20 in the class, so most of the patterns were on two looms.  
Jennifer gave 2 short lectures per day, and the rest of the time was spent weaving on each others looms.  Since I wasn't a speedy weaver, I didn't get to all of the patterns, but I did weave on several that interested me.  


The pattern assigned to me was a 2 block doubleweave windows. Some of Jennifer's samples of that structure are shown above and below. 

My own weaving on the warp left over is going pretty slowly, since it is being done on my new table loom, an 8 shaft Glimakra Victoria.
I did a little weaving on it tonight after work and dinner.  As can be seen by the length of the sample, it is slow going!
I chose to not weave the squares in the order they were threaded because I didn't want a diagonal line of solid color squares.  They are a little more random, as can be seen if the photo is clicked to enlarge it.  They are the colors I dyed earlier in the month that I wrote about.

Another project that I was working on was a set of 6 placemats.  I finished with the weaving a couple days ago, and finished with the wet finishing and ironing yesterday.  I was going to hem them, but decided to do a simple fringe after they were washed.  I think hems would have been too bulky.

These placemats were part of my effort at stash reduction.  Unfortunately, they hardly put a dent in the stash!

The warp was from a very large cone of 4 ply varigated blue, and the weft was from many cones of yarn used to make chennile bedspreads.  The colors remind me of the old Fiesta dishes from years ago.

I have enough warp left on the loom for another set.  I will think about it a bit, before I start the next set, since I don't want to do the same thing again, and I don't want a lot of yarn color changes, because I hate starting and ending yarn. 


Wednesday, October 6, 2010

Preparing For a Doubleweave Class

After a long hiatus from weaving and writing, I have started preparing for a class I will be taking next week.  Michigan Weaver's Guild
http://www.michiganweaversguild.org/workshops.html
is offering the three daydoubleweave class with Jennifer Moore, author of a new book on doubleweave. 

A friend from downstate told me about it and invited me to stay with her and go to class together.  I'm really looking forward to the class and getting together with other weavers again. 
After checking out the class, I realized I needed a loom with more shafts, so I started looking online and a couple days later, found this sweet loom.
It is a Glimakra Victoria 8 shaft table loom on a stand.  This class is getting expensive already!  I haven't even tried it out yet.  One thing I would like to do with this loom is to convert it to treadles.  If any readers have one like it with treadles, I would value your input on how they are hooked up.  What little I have found about converting, is that the company only makes a kit for the 4 shaft table loom.  I just need to see how they are hooked up, and I think Bob and I could make our own kit.

The doubleweave class is set up as a round-robin, which means everyone weaves samples on other class member's looms.  I received my pattern draft last week, and since that didn't leave enough time to buy more yarn, I am using my stash. 
The pattern calls for seven colors, which I didn't have, so out came the dyes last night. 

Since the beautiful fall season is upon us, I chose a fall color theme. I took the few colors I had of a 6/2 weight cotton and overdyed them to get the colors I wanted.


I finished rinsing them out today after I got home from work, and they are out on the line drying right now.

As soon as they are dry, I will start winding my warp, maybe today, or possibly tomorrow after work.

I love working with color, and trying ones that aren't my favorites.  It keeps me out of a rut, and have actually gotten some new favorites through the dyeing process.

Monday, August 9, 2010

Tips For Rag Rug Hems

I was curious how my rugs turned out, so last night I cut them off the loom after using Kati Meek's method of securing the warp for the next rugs.

I showed the start of these quite a while ago.  The first one is a little nondescript unless you get up close.  Then it looks kind of interesting, because the fabric I used had quite a bit of color in it.  From a distance, though, it just looks boring tan.


This rug was woven with five fabrics, with strips approximately 13-14" long and 3" wide.  I seamed them together in a set order, although I think I reversed it a couple times.  My loom was warped at 12 epi, in a 12 dent reed.  That allows me to weave a hem on harnesses 1-3 vs 2-4.  I weave the rags with harnesses 1-2 vs 3-4, which gives me doubled warp at 6 epi.  I had a friend teach me this technique, and I think it makes a good sturdy rug, with hems that don't pull in too much. 
Oh, and another technique I use with the hems is to arch the weft, instead of just angling it.  I play around with the amount of arch until I get it where it isn't pulling in.  If I owned a temple, I probably wouldn't have to worry about it so much.  I made the mistake of weaving one hem on this rug the way like I wove the rags with the doubled warp.  The doubled warp hem pulled in a bit.

Saturday, August 7, 2010

Young weaver, sewer, knitter

I spent a nice couple days with two of my grandchildren.  Emily and David came over the other night and we worked on some projects, and of course, had to have a tea party or two.

I promised Emily that I would show her how to make a cloth wallet.  We went through my cotton calicos and she picked her colors she wanted to work with.  She is only 11, and I think just a little young to use the rotary cutter yet, so I did the cutting for her.  I suppose I could have traced the pieces and she could have used scissors.  Oh well, I never think of cutting patterns out that way any more.
Here is Emily, showing the inside of the almost completed wallet.

And the outside. 

She did a fine job with the sewing and pressing.  I did let her use the iron.  My old Pfaff 1229 is a great machine for children to learn on.  I've taught a lot of kids to sew on it.   I can reduce the speed quite a bit, and the one stitch at a time feature is great when sewing corners or anywhere a lot of control is needed.  I think Emily is going to take after her mother, Becky, since it seems to come very easy to her.

Emily did a bit of weaving on an ongoing project I have set up on my countermarche floor loom for the older grandkids.  It's just a striped twill, but they are learning how to walk the treadles and how to tell where they are in the pattern.  Unfortunately, I didn't get any photos of Emily weaving.

A friend of mine that used to teach Montosori years ago, gave me a real nice rigid heddle loom so I could use it to teach.  I try to keep a warp on it for the younger kids that can't quite reach the treadles on the floor loom yet.  David took to it like a duck to water.


David is really concentrating on getting his angle and edges just right.


Emily recently made a sock monkey, and wanted to make a scarf for him, so we took a look at my yarn choices and she got started on that project after finishing her wallet.  She decided about how many stitches wide she wanted to make it, sampled a little bit and decided it was too wide.  It didn't bother her at all to rip it out and start over.  I think she understands that sampling can be an important part of the process.
Here's Emily, showing "Joe" how to knit.
It was a good couple days.  I love teaching anyone that loves learning.

Friday, June 25, 2010

Stash Reduction Rag Rugs


I am on a stash reduction mission.  I have so much fabric in my stash, from other people and stuff that I bought that I need to make some space to work.  I tried selling some at a garage sale, but that wasn't too successful, so rag rugs should help get rid of some of it.

I own a nice book about making rag rugs (shown below),

 so I've been using it for some ideas.  I liked the idea of sewing strips a set length together to make a diamond pattern, like the photo from the book (below):

I'm still playing around with the length of strips that will work the best, since my warp on the loom isn't the same width as the one in the book.  My first try wasn't with long enough strips, so the colors didn't advance enough. 

The color change remained at the edges, and I didn't like the look.  My next try was with strips that were about 4" longer than the first try, but I don't like that much better.  I think I have to have a lot shorter pieces, with the total of them being about twice the width in the reed plus 3-5". 


I will probably try that tomorrow after I get home from work. 

I did a couple things differently when preparing my strips.  I found that 3" wide strips worked the best.  I also didn't want to butt the ends together and zig-zag them.  I prefer a seam on the diagonal
 
as I'm demonstrating.  Place the two strips at right angles, and then stitch from corner to corner.  It reduces the bulk of the seam so it isn't all in one spot, and will be more secure than a butt join.

I'm too tired to work on this any more tonight, so I will wait till tomorrow and then unweave what I have tested and recut the lengths. 

Monday, May 31, 2010

Colors of May At the Daisy Hill Puppy Farm, Charlevoix, Michigan

I think that April slipped by me without posting photos of the colors for that month, but I've been out several times getting photos of the colors of May in Charlevoix.
To check out other colors of May from around the country, visit Sue's blog: Colors of May
She puts out a request for colors from each month to give everyone inspiration with their fiber arts. 
T
Early in May, the three colors of lilacs were beautiful and the smell was wonderful.

Our granddaugher Emily (age 11) snapped this photo of bleeding hearts and lily of the valley. 


Emily also took these two butterfly pictures.

Forget-me-not flowers are a beautiful blue color.
The columbines are beautiful this year.  I wish they lasted a bit longer.

Yellow Lady's Slipper (a protected wildflower)
This mushroom cap is about 4" across.

The two photos above are of the pitcher plant, and are a protected wildflower.  If you ever see one, please don't pick it.  It also applies to trillium and lady's slippers. I have many more photos, but my computer is moving at a snail's pace tonight, so I'm settling on these.