Showing posts with label cloth beam. Show all posts

Monday, June 26, 2017

Weaver's Friend Progress

The Weaver's Friend loom is still in pieces, but I am slowly making progress on its restoration. I could have just reassembled it and started weaving, but where is the fun in that? I know myself well enough to know I wouldn't enjoy working on a loom that didn't feel nice. If the wood looks dirty or rough, it would bother me.

Here are the little steps I have accomplished so far.

I chose something simple to start. This handle and pawl only needed a light brushing before a coat of spray paint.
This is the part Bob made to replace the broken one. I did get a coat of stain on it yesterday, so it doesn't look so naked.

The cast iron parts on both frame ends were removed and painted.
The bottoms of the corner posts were originally painted black but much of the paint had worn off.  Here is one end drying after a new coat of paint.
Both end pieces were painted with a dark red trim around the frame. I mixed some paint and touched it up with a couple coats. It is probably a bit brighter than the original color.  I did tone it down with some brown.
The opposite end. The stenciling on the bottom rail needs some touch-up.
Not a perfect touch-up, but legible now.
 This is the cloth beam.  The ends couldn't be removed without stripping the flat head screw slots, so I just covered the wood and spray painted the ends.The ropes were not in good condition and needed to be removed.
The ropes were nailed into recessed holes and I couldn't pull them out because the wood was so hard.
My neighbor happened to come by so I enlisted him to try and remove the nails. All it needed was some muscle!
Various other parts were painted.  I wish I knew the names for them. Some of them do have a letter and number cast into them, for identification purposes when the Reed Loom Manufacturing Company was still in business.


Back beam brackets. Numbered L23 and L24.
Shaft brackets and screws. They attach to the bottoms of the shafts and are the connections to the four pitmans. Number L8.

There is a little more done, but I still need to download the photos, so I will save it for the next post.

Tuesday, June 20, 2017

Old Looms Have a Way of Finding Me

Garage full of Weaver's Friend loom parts.
My friend Joan Sheridan, shop owner of Heritage Spinning and Weaving in Lake Orion, Michigan was contacted by someone recently who wanted to find a home for an old loom. It is called a Weaver's Friend and was manufactured by the Reed Loom Manufacturing Company. Since I have gotten several old looms going again and no one else took the bait, she asked if she could bring it up to me.

It now sits on my garage floor in multiple parts.

This part attaches to the crankshaft and the lower back frame support board, and is cracked enough to not be usable.
It is the board in the center of this whole assembly of crankshaft, pitmans, and back support board.
Bob thought the design might not have been strong enough for the force on it, so he beefed it up a bit when he cut a new one. He also made holes for the washers at an angle so they would be perpendicular to the bolts instead of at an angle when everything is tightened down.
The other part of all this assembly is the support board with an arched metal piece that engages with the cog wheel in the center of the crankshaft. The pitmans are the four curvy wooden parts (two are shown in the photo above) and connect with the bottoms of the shafts. It all becomes the automated part of the loom to raise and lower the shafts during weaving.
This is a two shaft loom.  The shafts are very heavy due to the thick hardwood frames and the cast iron pieces. The metal heddles add weight also.
Sectional warp beam.
(
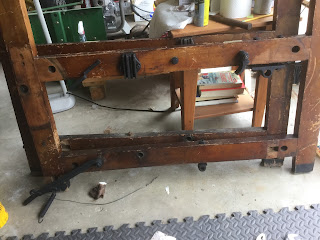
(L to R) Part name?, cloth beam, front bottom brace, breast beam, and back beam.
Beater that includes a 12 dent reed.
Top to bottom: handle with pawl, sleying hook, crank handle, rag shuttle.


A few boxes of rag strips were included.

Also included was a blue chained warp and three  large cones of cotton yarn and one mystery fiber.

My hope is to get the restoration done by next week and get a warp on and threaded by the beginning of July.  If that all happens and everything is working well, it will take a trip over to the Walloon Lake Antique Flywheelers grounds to be used as a demonstration loom at the end of July.

That is all contingent on how I am feeling on any given day.  I am halfway through my chemo treatments, with my forth one scheduled next Thursday. I have four or five days of not feeling well following treatment, and am finding I am getting progressively more tired from each one. Daily afternoon naps have become part of the routine. This project has been a nice distraction.

I have started cleaning the loom and removing cast iron parts and painting them. My next post will start showing my progress.


Wednesday, July 11, 2012

Weaver's Delight Restoration - It's Looking Like a Loom!

I went to the hardware store after work today to pick up some bolts and wingnuts to attach the top of the beater.  When I got home, I found out I bought the wrong size.  I found something in the basement that will work till I get the correct hardware.

I was able to attach the other "flapper thingy" on the fly shuttle temporarily, until I get an oblong washer that needs replacing and the correct bolt that my dad is going to make for it.

The apron was another fairly simple job to tack on, once I installed the cloth beam. 

After adjusting the brackets that hold the shafts, all four of them slid in easily.
Here is the loom from the rear, showing the sectional beam that I put on tonight.  It sure is heavy!  It still needs some cross braces made, to keep the wooden bars from giving when the warp is wound on.  I will have to get measurements for that tomorrow, so Bob can get them made.

I still haven't attached the picker sticks, since I am still waiting for the new pickers and leather straps.  Hopefully, they will arrive soon.
In the meantime, I still have more to work on.  The thread rack spindles are very rusty, so I took them all off tonight.  I think I will try the navel jelly on them tomorrow, instead of vinegar.

It was getting dark out and the mosquitoes were getting annoying, so I will get the rest of the red frame cleaned up and painted tomorrow.  My favorite color!

I've started looking at some rug books for inspiration.  I will have to be deciding what my first project will be very soon.


Thursday, June 7, 2012

Weaver's Delight Restoration - More Taken Apart

The loom is slowly getting taken apart, mainly to clean rust off most of the cast iron brackets, and to get metal parts out of the way so I can sand and varnish the wood.

Two days ago, I finished painting all the black trim on the wood.  After that dried, I started getting the first coat of varnish on the wood framework.  I will lightly sand that first coat and then add another. 

The wooden bars with the pegs on the sectional beam needed to be cleaned and sanded.  I managed to finish that, and got a coat of varnish on them, also.  I will lightly sand them and get another coat of varnish on them, and then be able to assemble the sectional beam.


The frames to raise and lower the shafts were in pretty good shape, with minimal rust.  I finished removing them from the shafts last night, and used a wire brush on the drill to remove what little rust there was and then painted them tonight.  I finished painting the one side remaining in the photo tonight.
These parts to the shafts aren't going to be fun to clean.  The two that are done were cleaned with navel jelly and a lot of elbow grease.  I'm having to give my right hand and wrist a bit of rest from the sanding.  It was affecting my nerves last night and today.  I need to get my grip back to normal.  Electric sanders and drills speed up the cleaning process, but the vibration isn't too good for my body!  

I took the handle off the beater bar.  It is cast aluminum, and was ugly, so I primed it and painted it hunter green, like the other metal parts.  I think it looks much better.  I'll get a photo of it once I clean up the screws and reattach it.

The breast and back beam rollers are a very rough wood, and no amount of sanding is going to smooth them, so I just put a coat of varnish on them.  Hopefully, light sanding between several coats of varnish will help smooth them out a bit.  I think they rotate, so I don't think smooth is critical.  Obviously the loom came that way, and I'm sure many rugs were made on it through the years.  This is the front of the loom.  Even one coat of varnish has made a difference to the beam.


I still haven't touched the cloth beam, except to remove it from the loom to make it easier to paint the trim below it.  I still need to unwind the apron to see it's condition.  Hopefully it is just dirt that I will have to deal with, rather than replacing it.  Even if it needs replacing, it won't be too big of a deal.  I'm just hoping I don't need to run to the fabric store to purchase canvas and grommets.  It does look pretty dirty!


I like how the wood is starting to look.  This has the black trim finished, and one coat of varnish.  I am done with working on it this week.  We have a happy occasion to celebrate this weekend at the 65th anniversary picnic for Bob's mom and dad.  Next week, we have a sad occasion also, when we go to my sister's funeral.  We just found out about it tonight.  It was unexpected, and I'm sad.