Thursday, November 17, 2016

Progress With the 10-Shaft Counterbalance Loom


I posted back in July about my latest loom restoration, and have been weaving on this old Swedish 10-shaft counterbalance loom.

Since I didn't know anything about a counterbalance loom with more than four shafts, I decided that was where I would start.

The only tie-up cords on the loom were the ropes on the front and back beams.  I had to make and figures out the rest.

I didn't have many spare string heddles, but found enough to make a test warp with about 170 ends.
Laila Lundell's book, The Big Book of Weaving, was very helpful with all the set-up.  I didn't have any Texsolv for the tie-ups, so I just used cording I purchased from the hardware store.  I figured it was cheaper if I made a mistake cutting lengths and could always be replaced once I had the loom working properly.

This shows the stage of leveling the shafts before tying up the lamms and treadles.
My first few inches of a four-shaft goose-eye pattern.  Everything seemed to be working properly.

This was my first experience using shaft levelers, the two notched bars hanging from one of the cross pieces.  I didn't have any, so Bob made me a couple sets, one for six shafts and one for ten.  The upper shafts fit into the notches and the whole set-up starts with them being hung from the beam above and leveled.

Notice the loom is still set-up in the garage.  I decided to wait to put Julie (named after her previous owner) in the studio until I finished the first warp, since there was more room to move around the loom.  It is hard enough at my age to crawl around under a loom, but even worse if it is in cramped quarters.
Success with four shafts!
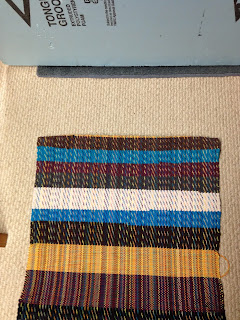
I was able to get a long and a short table runner out of the sample warp.

Lining Up Varigated Yarn Colors in a Warp

I spend entirely too much time on pointless things just to answer a question I have had in my mind.

I little while ago, I was given an ugly cone of varigated yarn. Agree?

My question I wanted to figure out was how to wind a warp a specific length and get the colors to line up.

The varigation is short, with each color only about 6" long, so the colors would look muddy if I wound the warp straight off the cone.
I determined the length I wanted for a scarf and after winding to the bottom and reversing, realized that wouldn't work because the colors were in the reverse order with the second pass back to the starting peg.

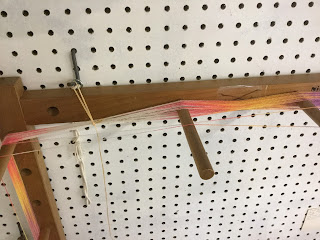
To get them in order, I needed to make a continuous warp around the board. My start is at the top right peg.
When I got back to the start peg, I determined how much excess yarn I had before the colors lined up again.

I added two pegs on the right side to wrap the excess around until the colors lined up.
I made two wraps around both pegs and one or two wraps around a single peg for each pass around the warping board.
As I made each pass, I made my cross.  After deciding how many warp ends I wanted in each inch, I used a counting cross for each half inch, just to keep track of the number of warp ends wound, and to fit in my 1/2" spaced raddle.

When I am done winding the warp, I will tie off my cross, add some choke ties at the beginning, and right before the two end pegs and then a couple along the length to keep everything stable before cutting it below the start peg.

With everything stable, I can unwind the excess at the two pegs and trim all the warp threads evenly.

I still think it is ugly.  I'll see if my opinion changes after I get a loom open and start weaving the scarf.

Tuesday, September 6, 2016

New Addition to the Collection

Looms are keeping me busy.  I realized I started this post quite a while ago, sometime in late winter, and never finished it.

I recently had an opportunity to add a very large loom to my studio. I don't recall how I came across the Craig's List posting, but it was only three hours away. After checking with the seller and a couple others familiar with the Bexell Cranbrook countermarche or counterbalance looms, I found it could be upgraded to an 8-shaft loom, so I decided to make the purchase.

Near the end of February, my daughter Carolyn and I collapsed the stow-and-go seats in the van and took off for Midland, Michigan to meet my new loom and former owner Maryanne.

Here is Maryanne saying goodbye.
Here is a photo of how it is supposed to look.

On that day, though, it was just a pile of lumber, strings and chains in the back of the van.  We really had to squeeze to get the two side pieces diagonally in through the back hatch, but we were successful.

A bonus with the purchase were the extra reeds, shuttles, rug yarn, and warping reel.

Bob was a good sport and helped cart all the pieces upstairs above my studio and then did most of the assembly with my assistance.

See that beater?  It was designed for making tight rugs.  It is heavy!
It is a great loom for assembling.  Pegs and no bolts make is so easy.

Above Bob's head in the foreground is the jack mechanism for the countermarche.  There is definitely room to add four more shafts.  We just need to go purchase the hardwood.  We will need to cut eight more jacks, four treadles, eight shaft bars, four lower lamms and four upper lamms.  When I do the additions, I will probably use Texsolv cord instead of chains for all the tie-ups.
This baby is ready to warp!

I decided to try and use the four yard warp that was still on the warp beam.  It was a bit tangled, so I got a bit of weight on it and started dangling it down the stairway to get it straightened.

There was no cross, so here I am inserting a lease stick into the warp at the back.  It was a pretty warp, with lots of colors, so it was worth trying to save.  Since every two warp threads were a different color, it was pretty easy to get the cross back onto the lease sticks.
Barbell weights work nicely to add tension to the warp when winding onto the warp beam.  It went on the loom quickly.
I started the first rug and then I let Carolyn take over.  This was her first weaving experience, and she took to it right away.
She had made a quilt from her fiance (now husband) Jeremy's old tee-shirts and we cut the scraps into strips for the rugs.
Even her kitties get a rug for under their food dishes.  A good use for the short bit of warp remaining.
By the end of March, we took the rugs off the loom.


The rugs now live in Green Bay, Wisconsin, and look very nice in Carolyn and Jeremy's kitchen.


Sunday, July 24, 2016

Ten Shaft Counterbalance Loom

Recently, a friend who is also a weaver, offered to give me a Swedish counterbalance loom with ten shafts.  She owned it for many years but had never used it.  She just wasn't inclined to getting it up and running when she had other looms that she loved. She knew I liked to restore looms that might be useful to me, so that is how I got started with my most recent project.

I had never heard of a counterbalance loom with more than four shafts until she told me about hers.  I made arrangements to go see it in May.  It interested me, so I told her I would take it but would have to wait until July, when I could have another friend look at it, because she knew a little bit about that type loom.

This is how it looked when I picked it up at the beginning of last week.  It is basically put together correctly except for the treadles.
View from the back of the loom.
Drall pulleys, with five levels.  I know very little about how this works at this point.
Another view of one of the pulley systems.
The beater is hung with this gadget.  It moves forward or back by turning the knob.
 The other side of the beater adjustment hardware.
 Me and the loom all packed in the van.  It fit better than when I picked up my Cranbrook loom.  It is a little bit smaller, and a whole lot lighter.
After getting it home, I started working on cleaning the smaller things first, since they were the easiest to get out of the van by myself.  I wiped everything down well with a damp rag so I could assess the condition of the wood.  Most everything was in pretty good shape, so I decided to just clean up any of the wood that would not be touching the yarn.with some Old English wood cleaner.

This is the pile of lamms, shaft bars and lease sticks after cleaning.
The beater, breast beam, back beam and knee beam all touch the yarn, so I lightly sanded the finish and added a coat of polyurethane.
A wire brush was used to remove any loose paint and rust on the hardware. I sprayed it with Rustoleum to protect it before reinstalling it on the loom.
Bob gave me a helping hand reassembling it this afternoon.  I still need to install the lamms and treadles.  I put some poly on the treadles, so my feet would slide on them, and with the high humidity today, they needed more drying time.

The stringing of the shafts, treadles, cloth and warp beams are going to have to wait, since I need to order Texsolv cord and heddles.


The rest of this week will be taken up with getting ready for weaving demonstrations in the craft barn at the Antique Flywheelers show at the end of the week. Stop in to see all the demonstrations of the different farm equipment, saw mill, blacksmith, threshing, grinding flour, spinning, weaving, dyeing, and so much more. Here is a link for more information:
Antique Flywheelers show